Lag: The Bane Of Touch Screens

Lag in games is as inevitable as taxes. It’s something we can try to minimize, but we always need to live with it. Earlier this week, I noticed that input for my new iPad game was very laggy. Excessively so, to the point it was really detracting from the game, so I decided I had to look into it a bit more.

Lag In Games

got_lag.pngI’m defining lag as the time elapsed between the moment the player performs an input action (press a button, touch the screen, move his finger), until the game provides some feedback for that input (movement, flash behind a button, sound effect).

Mick West wrote a great article on the causes of lag in games, followed up by another one in how to measure it. I’m going to apply some of that to the lag I was experiencing in my game.

Lag can be introduced in games by many different factors:

  • Delay between gathering input and delivering it to the game.
  • Delay updating the simulation to reflect new inputs.

  • Delay rendering simulation state.
  • Delay displaying the latest rendered state on screen.

The new game runs on the iPad and involves moving objects around the screen with your finger. To make sure it wasn’t anything weird with the rest of the game code, I wrote a quick (and ugly!) program that draws a square with OpenGL that follows your finger on the screen. When you run the sample, the same lag becomes immediately obvious.

The iPad is a much larger device than the iPhone, and it encourages a physical metaphor even more. As soon as you attempt to move an “object” on screen, the lag kills that sense of physicality. Instead of moving an object around with your finger, you’re dragging it around with a rubber band. It moved the player from applying direct action on screen, to being removed and disassociated with the actions on screen.

Loop Structure

The place to start looking for lag is in my main loop. The main loop looks something like this:

	ProcessInput();
	UpdateSimulation();
	RenderWorld();
	PresentRenderBuffer();

So I was reading the input correctly before the simulation. Nothing weird there.

Touch input is delivered to the code as events from the OS. Whenever I received those events (outside of the main loop), I queue them, and then process them all whenever the main loop starts in ProcessInput().

The loop runs at 60Hz, so the lag here is at most 16.7 ms (if you’re running at 30Hz, then you’re looking at a delay up to 33.3ms). Unfortunately, the lag I was seeing in the game was way more than one frame, so there was to be something else.

Rendering

For some reason, I thought that iDevices were triple buffered. I ran some tests and fortunately it looks like it’s regular double buffering. That means that if I render a frame and call presentRenderBuffer(), the results of that render will be visible on screen at the next vertical sync interval. I’m sure there’s a slight lag with the iPad screen, but I’m willing to be is close to negligible when we’re talking about milliseconds, so we’ll call that zero.

Main Loop Calls

The game uses CADisplayLink with interval of 1, so the main loop is called once every 16.7 ms (give or take a fraction of ms). I thought that perhaps CADisplayLink wasn’t playing well with touch events, so I tried switching to NSTimer, and even to my old thread-driven main loop, but none of it seemed to make any difference. Lag was alive and well as always.

That the simulation and rendering in the game are very fast, probably just a few ms. That means the rest of the system has plenty of time to process events. If I had a full main loop, maybe one of the two other approaches would have made a difference.

It looks like the lag source had to be further upstream.

Input Processing

On the dashboard, press and hold on an icon, now move it around the screen. That’s the same kind of lag we have in the sample program! That’s not encouraging.

A touch screen works as a big matrix of touch sensors. The Apple OS processes that input grid and tries to make sense out of it by figuring out where the touches are. The iOS functions eventually process that grid, and send our programs the familiar touchesBegan, touchesMoved, etc events. That’s not easy task by any means. It’s certainly not like processing mouse input, which is discrete and very clearly defined. For example, you can put your whole palm down on the screen. Where are the touches exactly?

TouchesBegan is actually a reasonably easy one. That’s why you see very little lag associated with that one. Sensors go from having no touch values, to going over a certain threshold. I’m sure that as soon as one or two of them cross that threshold, the OS identifies that as a touch and sends up the began event.

TouchesMoved is a lot more problematic. What constitutes a touch moving? You need to detect the area in the sensor grid that is activated, and you need to detect a pattern of movement and find out a new center for it. In order to do that, you’ll need several samples and a fair amount of CPU cycles to perform some kind of signal processing on the inputs. That extra CPU usage is probably the reason why some games get choppier as soon as you touch the screen.

Measuring Lag

Measuring lag in a game is tricky. You usually can’t measure it from within the code, so you need to resort to external means like Mick did in his tests.

I decided to do something similar. I pulled out my digital video camera, and started recording my finger moving on the screen. The quality leaves much to be desired, but it’s good enough for the job. I can see how far my finger gets from the center of the square, but that’s not enough information to quantify the lag. How fast is my finger moving exactly? Fortunately, that’s something I can answer in code, so I added that information to the screen [1]. Now, for a given frame, I can see both how far the finger is from the center of the square and how fast it’s going.

lag_test.jpg

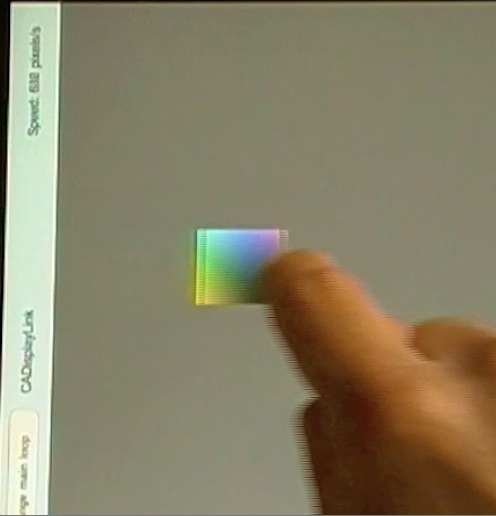
The square is 100 pixels wide. When I move my finger at about 500 pixels per second, the center of my finger is on the edge of the square. That makes a rough 100 ms total delay from input until it’s rendered. That’s a whopping 6 full frames at 60 fps!

What Can We Do About It

As iOS developers, there isn’t much we can do. Make sure your loops are set up correctly to avoid an extra frame delay. Make sure you provide feedback as soon as you can and don’t delay it any longer than you have to. Other than that, there’s nothing much we can do.

I’ve been saying this for a while, but I’m a big fan of layers as long as you can get to the underlying layers when you need to. Here’s a perfect case where it would be fantastic if Apple gave us raw access to the touch matrix input. Apart from being able to process the input faster (because I know what kind of input to expect for the game), can you imagine the possibilities that would open up? Input wouldn’t be limited to touch events, and we could even sense how “hard” the user is pushing, or the shape of the push.

At the very least, it would be very useful if we had the option to allocate extra CPU cycles to input recognition. I’m not doing much in my game while this is going on, so I’d happily give the input recognition code 95% of the frame time if it means it can give me those events in half the time.

I’m hoping that in a not very far distant, iDevices come with multiple cores, and maybe one of those cores is dedicated to the OS and to do input recognition without affecting the game. Or maybe, since that’s such a specialized, data-intensive task, some custom hardware could do the job much faster.

Until then, we’ll just have to deal with massive input lag.

How about you? Do you have some technique that can reduce the touch event lag?

LagTest source code. Released under the MIT License, yadda, yadda, yadda…

[1] I actually shrank the OpenGL view to make sure the label wasn’t on top if it because I was getting choppier input than usual. Even moving it there caused some choppiness. This is exactly what I saw last year with OpenGL performance dropping when a label is updated every frame!

This post is part of iDevBlogADay, a group of indie iPhone development blogs featuring two posts per day. You can keep up with iDevBlogADay through the web site, RSS feed, or Twitter.

Google App Engine As Back End For iPhone Apps

As soon as a game involves servers, there’s no such a thing anymore as “ship and forget”. Flower Garden put this in evidence about a month ago when I started getting complaints from users that the Flower Shop kept going down. Sometimes they weren’t even getting the items they were purchasing! (fortunately they can always do a free re-download, but they don’t always know that).

Flower Garden was using a shared Dreamhost server to upload bouquets, host in-game news, and, most importantly, to serve the Flower Shop (which involves hosting the static shop files, redeeming promo codes, recording transactions, verifying receipts with Apple’s server, and delivering purchased content). All the Flower Shop functionality was implement in PHP and using a mySQL database.

After some stressful sorting through the logs, it looked like the server was running out of memory and killing PHP processes. Dreamhost’s technical support didn’t help much and just claimed that I was simply something that happened and they would be happy to sell me a virtual private server. I was surprised to hear it was using up a lot of memory, and certainly nothing I could see with the tools available to me showed that. I certainly hadn’t done any changes in a while and traffic was constant. Doing some Googling at the time brought up lots of other angry Dreamhost users in a similar situation, so I suspected server configuration problems.

Whatever the case, I couldn’t let it be that way and I had to fix it somehow. I briefly considered a virtual private server, or even a dedicated host in some highly recommended providers. But in the end, the simplicity, scalability, and affordability of the Google App Engine won me over.

Now that Flower Garden has been using the Google App Engine for several weeks, I still think it’s fantastic. I wish someone had whacked me on the head when I started writing server code and forced me to use it. Hopefully this post will be more pleasant than a hit to the head and will still have a similar (good) effect.

Google App Engine Overview

appengine_lowres.gifEven though I was pretty much completely new to the Google App Engine (I had looked into it briefly before the launch of Flower Garden but dismissed it because they couldn’t support the amount of email traffic I needed), it took me two days to port over everything. Actually flipping the switch from the old system to the new one took a while longer, but that required more courage than work. More on that later.

This is not a Google App Engine tutorial. Instead, it’s going to be an overview of what it can do and why you should consider it as a backend for your iPhone app instead of using a shared or even dedicated server.

The first shock (at least for me) when looking into the Google App Engine is that you can’t run PHP. You’re limited to Java or Python. It turns out Python is my go-to scripting language, so I was thrilled at the idea. PHP is fine, but Python is a whole class above.

Next, it took a bit of adjusting to the fact that the environment to run anything on the Google App Engine has to be carefully controlled. You need to create a configuration file indicating the entry points and their handlers. Fortunately, all of that is well covered in the extensive online documentation.

This is what the Flower Garden config file looks like, indicating both static files and several execution entry points:

application: st-flowershop
version: 1
runtime: python
api_version: 1

handlers:
- url: /catalog
  static_dir: catalog

- url: /emailassets
  static_dir: emailassets

- url: /news
  static_dir: news

- url: /moregames
  static_dir: moregames

- url: /.*
  script: purchase.py

If you hit one of the URLs listed as static_dir, you get those files directly (like the in-game news). Anything else is handled by the Python script purchase.py. Google even provides the webapp framework that easily allows you to connect different parts of the script to handle different requests and easily get to the input parameters.

Once you’re past that and you have the requisite “Hello World” up and running, then it’s all fun and games.

One of the great features of the Google App Engine is that it comes with a fully-featured, local environment. This environment is installed automatically with the Google App Engine SDK, and there’s nothing to configure. It’s certainly nothing like setting up Apache + mySQL + PHP in your dev station! That way, you can do all your work locally, and only update the servers when you’re confident everything is working.

Beyond this, the only other thing that is different from what you may be used to is the datastore. They provide a query language called GQL, which is not exactly SQL, but it’s very similar. Close enough that I had no trouble porting over my very simple queries anyway.

Adding data to a data store couldn’t be simpler. For example, to add a promo code, I need the following class definition:

class PromoCode(db.Model):
	code = db.StringProperty()
	productid = db.StringProperty()
	amount = db.IntegerProperty(default=1)
	singleuse = db.BooleanProperty(default=True)
	enabled = db.BooleanProperty(default=True)

And then I can add it this way:

	promocode = PromoCode()
	# fill it up here
	promocode.put()

How do I check if a promocode is valid? I can use the SQL-like syntax, or something even simpler:

	q = PromoCode.all()
	q.filter("code =", code)
	return q.get()

Once you know that, you can go to town with your Python programs.

Google App Engine Advantages

Scalability
This was the big reason that forced me to move away from Dreamhost. I have no way of testing how scalable it really is, but I’m going to take Google’s word for it. They know a tiny little bit about scalability. And besides, Flower Garden is nothing compared to other apps (it serves about 1.5 requests per second on average).

Since I don’t know how things are implemented under the hood in the Google App Engine, I don’t have a good feel for performance best practices. So I’m hoping that my very simple queries (add to the end of a table, or see if a record is present) are just fine. If not, I can do some tuning down the line (and I won’t have to wait for any approval to make the code go live!).

Local environment
The local environment is simply great. It makes developing a pleasure. You can add any test data you want to the local datastore through a web interface without affecting the live server. Probably my favorite feature is the console: Since the server is running locally, you can print out any debug info in the server code and you can see it live as you perform some action. That saved me hours of debugging compared to doing it on a remote server with php!

Server synching
In the past, I’ve synced my server scripts through ftp and I kept meaning to write an automated script to do that. In this case, Google provides a script (and a GUI tool) to do the actual synching with the servers, which is great. It even waits a few seconds until it can verify that the new version is live on the server.

Python
I’m not a big Java fan (although I used it a bit way back in the day when it first came out), but I do love Python. For a program with some complexity like this, it’s definitely a much better choice than PHP.

Real-time stats
The Google App Engine web console displays real-time stats of access to your site. You see it expressed in requests per second and you can visualize it in the past few hours, days, or even month. You also have access to all the logs, and you can filter by type of log message (debug, info, warning, error).

Price
This is one category where the Google App Engine definitely shines. Every day you’re given a free quota of bandwidth, disk usage, and CPU usage. If you stay under that quota you don’t pay anything. If you go over, you pay per unit as you go (at very reasonable prices). You can even set a maximum cap on daily spending so you don’t encounter any nasty surprises at the end of the month.

So far, Flower Garden has been hovering right at the edge of the outgoing bandwidth free quota (the rest of the metrics it doesn’t even come close). So even if traffic were to double, expenses would be very reasonable.

Development Tricks

Along the way, I figured out a couple of interesting tricks that helped me during development.

Bypass the App store for testing
For me, few things are more annoying than doing development in the actual device. Iteration is slow and stepping with the debugger is mostly impossible (seems to depend on the mood of the debugger that day). So I try to do the bulk of the development on the simulator and just test on the device when things are ready.

Unfortunately, the device can’t access the App Store, which makes testing all the server functionality dealing with the App Store painful. What I did was to add a define that, when present, the program bypasses the App Store but still functions as usual.

Local server
During development, you want to be using your local server. In my case, I set it up so that Debug versions of the code access the local server, but Release and Distribution ones access the live one.

There is one problem: The Google App Engine server, by default, binds itself to localhost, not to the IP address of your network card. That meant I was able to hit it from the simulator just fine accessing http://localhost:8080, but not from the device. In order to access the development server from the device, I had to explicitly tell the server to bind itself to another address like this:

dev_appserver.py --address 192.168.1.150 FlowerShop

Now I can access the server at 192.168.1.150:8080 from both the simulator and any device.

Switching servers
Porting the code took just a couple of days. Making the switch on the live server was a lot scarier though. I couldn’t wait for a new update to be released because that seems to take over a week these days, so I forwarded requests from the old server to the new one.

I did it one system every day, avoiding weekends which is when there’s the most traffic. News was easy, and so was the web view with more games. But I ran into a snag with promo codes and Flower Shop purchases.

Initially, I was just redirecting requests in .htaccess this way:

Redirect permanent /Shop/catalog http://st-flowershop.appspot.com/catalog
Redirect 301 /Shop/catalog http://st-flowershop.appspot.com/catalog

As I learned the hard way, POST variables aren’t preserved in a redirect of that kind (I guess to avoid state being changed in multiple servers). I tried a bunch of things, but in the end, I wrote a quick php script that gathered all POST variables and re-posted them to the new request. A bit ugly, but it did the trick:

<?php
function PostRequest($url, $_data) {

    $data = array();    
    while(list($n,$v) = each($_data)){
        $data[] = "$n=" . urlencode($v);
    }    
    $data = implode('&', $data);
    // format --> test1=a&test2=b etc.

    $url = parse_url($url);
    if ($url['scheme'] != 'http') { 
        die('Only HTTP request are supported !');
    }

    $host = $url['host'];
    $path = $url['path'];

    $fp = fsockopen($host, 80);

    fputs($fp, "POST $path HTTP/1.1\r\n");
    fputs($fp, "Host: $host\r\n");
    fputs($fp, "Content-type: application/x-www-form-urlencoded\r\n");
    fputs($fp, "Content-length: ". strlen($data) ."\r\n");
    fputs($fp, "Connection: close\r\n\r\n");
    fputs($fp, $data);

    $result = ''; 
    while(!feof($fp)) {
        $result .= fgets($fp, 128);
    }
    fclose($fp);

    $result = explode("\r\n\r\n", $result, 2);
    $header = isset($result[0]) ? $result[0] : '';
    $content = isset($result[1]) ? $result[1] : '';
    return $content;
}


print PostRequest("http://st-flowershop.appspot.com/purchase", $_POST);
?>

Conclusion

I hope this post is enough to at least make you interested in checking out the Google App Engine and help you get over a couple of the initial hurdles. I’ll definitely be using it in any future projects.

This post is part of iDevBlogADay, a group of indie iPhone development blogs featuring two posts per day. You can keep up with iDevBlogADay through the web site, RSS feed, or Twitter.

Reconsidering Version Control

Ever since I turned indie, version control just hasn’t been much of an issue. Gone are the days of hundreds of multi-GB files that changed multiple times per day. With small teams of one or two plus a few collaborators, Subversion hosted remotely worked fine. Of course, all the cool kids these days are going on about how their distributed version control systems solve world hunger, but I’ve been mostly ignoring it because I have better things to do with my time (like writing games [1]).

Yesterday things changed a bit. As a result of last week’s “growing” post, Manuel Freire is going to join me to help with Flower Garden development. That makes two of us banging on the same codebase, and from two different time zones, so we don’t get the benefit of being in the same closet as it was the case with Power of Two Games. Since I was in my get-things-done mindset, I figured I would just set up a new svn repository for the project, move over the Flower Garden data, give us both access to it, and move on.

But no, it couldn’t be that easy. Can you guess what the first words out of his mouth were when I asked him about version control? “Oh, I love Git!”

That was the last straw. I had to do a mini-research session on version control systems, so I spent a couple of hours looking into it. If we were going to move over to something, now would be the time to do it.

Git and Mercurial

Git and Mercurial both look great. I was debating which one to go with until I realized that they’re both two flavors of the same thing, so it comes down more to personal preferences and tastes. This is best description I found on the differences between Git and Mercurial. When it comes to computers, I’m totally a MacGyver guy (actually, that might be true when it comes to anything now that I think about it), so that made my decision easier.

The big feature everybody keeps talking about for distributed version systems is effortless branching. That’s great, but I really have no intention of branching much. I haven’t created a single branch in the last four years, and I don’t expect to start doing that now. Next.

The other big feature is working disconnected from the network. That’s something I could use, but considering I’m only offline a handful of times a year, it really isn’t enough of an incentive to switch to a whole new system.

Git sounds like a great tool for large, distributed, open-source projects with hundreds of contributors, but frankly, I couldn’t find anything else that was worth mentioning for a small project and a handful of people. I feel like someone is trying to sell me a Porsche when my beat-up Hyundai is still perfectly functional for driving to the grocery store once a week. Am I missing something obvious?

Hosting

Hosting the actual repository was part of the consideration. This is for a private project, so all open-source sites are out. Ideally I wanted to host it just like I do with Subversion in Dreamhost, but the instruction page on how to install Git and Mercurial are enough to put most people off. Clearly, there’s a steep learning curve there.

server-rack.jpgSo I asked on Twitter for recommendations. I’ve learned that Git and Mercurial users are definitely very vocal and are always willing to help someone join their ranks. Within minutes I had all the suggestions listed below:

Prices varied a lot. From the $25/month/user of Kiln, to the $6/month of RepositoryHosting (gets you unlimited users and 2GB of storage). The Snappy Touch repository is already over 2GB, so it would end up being a bit more expensive than that, but not too bad.

Of those, Github was definitely the most recommended. I was starting to feel Git might not be the one for me, so I looked a bit more into RepositoryHosting because they had Subversion support. It turns out they also provide Trac, which is a great tool, although I already have that set up myself.

Wish List

Binary files

The one thing I really want in a version control system is good large binary file handling. I check in everything under version control, source code, assets, raw assets, and even built executables for each version. I want to be able to throw multiple GB psd files in the repository and have it work correctly (meaning fast, and using the least amount of space possible).

Perforce did an OK job with that. Git and Mercurial apparently are both horrible at it. So is Subversion, but at least it’s a tool I already know and I don’t have to spend time learning the ins and outs of how to optimize the Git database or how to make backups, or cull unused trees.

GUI

I love my command-line tools. I live in Terminal for a good part of the day, and having a real shell is one of the things that makes my life so much more pleasant under Mac OS than under Windows. But there are some things for which a GUI tool is a really useful addition, and version control is one of them.

On the Mac, I’ve been using Versions as a client for Subversion and it does everything I want. It’s fast, handles multiple repositories, lets me browse history, diff changes, etc. From my brief search and other people’s comments, there’s nothing quite like that for Git or Mercurial yet. That’s a pretty big, gaping hole.

Low-level access

Looking at all those hosting providers, I realized how much I want to have low-level access to the database. I want to be able to back it up myself, and run svnadmin when I want to. A lot of those hosting sites looked really pretty, but you were very limited in what you could do.

Coming To A Decision

If this were a thriller, you’d be disappointed. I’m afraid there are no plot twists and you can already guess the conclusion.

In the end, since neither Git nor Hg are built to address my biggest need (large binary files), I’ll stick with svn. It might be old, it might not be cool, but it serves my needs, I already know how to use it, I have the tools, I can admin it and fix a problem. I can concentrate on what matters instead: Writing games.

I decided to continue hosting it myself on Dreamhost. I can easily have one repository for every major project. However, by default, Dreamhost creates svn repositories using htaccess security and HTTP protocol. That’s OK, except that none of the actual data is encrypted as it would be if I were using ssh. I could use HTTPS, but then I would have to set up a certificate and pay for a fixed IP address, so instead I found an alternate way to have a secure connection.

All Subversion repositories live in a user account (svnuser). I create a new user group for every repository, and change all the files in the repository to belong to that group. Make sure you also set the SGID bit so any files created in that directory still belong to the group. Then I can create a new shell user for every collaborator, and add him to the groups of the repositories I’d like him to have access to. At that point, he’ll be able to access the repository as svh+ssh://username@hostname.com/home/svnuser/repository. All safe and secure.

Bonus SVN-Fu

Here’s something that I learned yesterday while I was moving repositories around. It’s probably common knowledge for seasoned SVN admins, but it was new to me.

I had a repository that included a bunch of my projects. What I wanted was to create a new repository that still had all the history, but only for the FlowerGarden part of the tree. I knew about svnadmin dump for transferring whole repositories, but I didn’t know there was a very simple way to only transfer part of it.

First you need to dump it as usual:

svnadmin dump repository > repos-dumpfile

Now, it turns out you can process the dump file before adding it back to another repository. So we can do:

svndumpfilter include FlowerGarden --drop-empty-revs --renumber-revs < repos-dumpfile > fg-dumpfile

Finally, you can add the resulting dump file into a fresh repository and have all the history for that project and only that project:

svnadmin create flowergarden
svnadmin load --ignore-uuid flowergarden < fg-dumpfile

Amazingly, for a repository that was over 2GB, that only took a few minutes. Go Subversion!

[1] Or reading. Or going for a walk. Heck, even sleeping would be a better use of my time than futzing around with a new tool.[2]

[2] And yes, I realize I sound like a grumpy old man. Getting there apparently. Now get off my lawn.

This post is part of iDevBlogADay, a group of indie iPhone development blogs featuring two posts per day. You can keep up with iDevBlogADay through the web site, RSS feed, or Twitter.

Growing, Indie Style

The media have covered to death both sides of the coin: The stories of developers striking it big, and how the great majority of indies don’t recoup their costs. A few days ago, Markus looked at indie iPhone development and how there is a middle-ground group of developers that are able to make make a living at it without going broke but without getting that big hit. Let’s call them the developer’s middle class.

Markus suggested that about 20% of developers fall in that middle class, but my gut feeling, when it comes to iPhones and games, is that it’s more like 5-10%. But it’s just a made up number based on personal observation anyway. It would be very interesting to conduct some sort of survey (or analyze the App Store data), but I fear the results would get muddled up due to the differences between full time indies, hobbyists, and big companies.

Snappy Touch falls squarely in the developer’s middle class. I’ve been very lucky and Flower Garden’s sales have been remarkably stable, hovering at around $2,000 per week (and spiking up during promotions and new updates).

For the 90% of developers that don’t make their money back, their choices are limited to either stopping, or digging deeper in their pockets (or somebody else’s pockets) and try again. For the 0.1% that hit it out of the park, they bring in so much money they can pretty much choose to do anything they want without risking the company.

For us middle-class developers, things are tougher. We have two choices:

  • The first course of action is plodding along doing what we’re doing, making a reasonable living and putting some money aside. We can build our personal and business nest egg, and then a bit more. And we can love every minute of it.
  • Choice number two is to take any spare money and reinvest it in the company. And in the case of iPhone development, that can only mean getting more people involved creating the games.

time-vs-money.jpgThe first choice is nice and safe. We can keep doing what we love, making a living from it, and even saving some money. Assuming the App Store doesn’t collapse overnight, we might be able to pull that off for a few more years. But it has a horrible hidden cost: The opportunity cost.

Most long-term, successful apps will require a fair amount of updates. New content keeps users interested, and they also expect support for new hardware (iPad, iPhone 4, etc). All the time I spend creating updates for Flower Garden is time I don’t spend making a new game. At the top of my list of hundreds of game ideas, I have four or five that I know will be successful, but the bottleneck from making them happen is my bandwidth. I can only do so much by myself.

That’s why I’ve decided that Snappy Touch needs to grow. Mind you, I’m not talking big corporation, I don’t ever want to even get to 20 people. But I would love to eventually be able to have a small team working on a new project and a few other developers maintaining and updating existing projects. I envision it happening mostly as distributed development and not in a traditional office setting.

The problem is how to start. Going from one to two people is probably the hardest step in growing a company. It’s a 100% increase! That’s probably another reason why successful startups often have three people involved from the start: Adding a fourth person is “only” a 33% increase in size, which seems more manageable.

Adding another person is also scary from a money point of view. It’s going from saving just a bit of money, to potentially spending it all so that maybe we can produce more games and make more money in the end. That’s a lesson I learned very clearly in Dope Wars: You need money to make money. To get crazy scores in that game, you had to take a huge loan out from the start (and then be really lucky). Except that in this case there’re no loans (I’m totally self-funded). And it’s also not a game, it’s real life.

Having said all of that, I’m going to turn this post into a recruiting tool (which is great because it self-selects the target audience to people who read this blog or follow me on Twitter).

Position Description

[Edit: Thanks for the overwhelming response! I already have enough candidates and the tricky part is selecting just one! I’ll post again whenever a similar opportunity opens up. Thanks!]

I’m looking for an programmer intern/part-time entry level position. Later on, if things work out, it could become a full-time position. I’m looking for someone who can dive into the Flower Garden source code and quickly be able to start maintaining it and adding features. I’ll definitely remain involved with the project, but I’ll be mostly setting the direction and working on the harder bits. I expect us to be in contact on a daily basis, and set up a quick iChat call once or twice a week (or if you’re local we can work half a day a week together).

Requirements

  • Very familiar with iPhone development (you should have some apps under your belt).
  • Very familiar with Objective C and the UIKit framework
  • Good knowledge of C (and a tiny bit of C++)
  • Available to work 10-20 hours per week. This is very flexible.
  • Bonus points for knowing Python or having used the Google App Engine.
  • I’d prefer someone who can work for several months (and maybe longer term).
  • Local to San Diego would be great, but not a requirement as long as we can voice chat easily.

Compensation is hourly and based on experience, but remember this is an intern/entry level position. Possible bonuses based on performance and sales. Sounds like something you’d be interested in? Drop me a note and convince me you’re the right person for the job..

This post is part of iDevBlogADay, a group of indie iPhone development blogs featuring two posts per day. You can keep up with iDevBlogADay through the web site, RSS feed, or Twitter.

Customizable Color Sections With OpenGL ES 1.1

One of the items in my ever-growing list of things to write about, is the rendering techniques I used in Flower Garden. In the end, it would make for a post with lots of pretty pictures, but there’s nothing particularly ground-breaking. After all, it’s all limited to OpenGL ES 1.1 on the iPhone, which means only two texture units and a two-stage texture combiner. As a result, more interesting ideas keep bubbling up to the top of the list and the poor rendering idea keeps getting passed over.

Every so often, something happens that bumps up the priority of one of the items in my list. Maybe it’s another related blog post, or a game coming out with something relevant to what I wanted to write about. In this case it was a tweet from Paul Pridham [1]:

tweet.png

Customizing colors in a sprite or texture is very frequent in games, from changing player characters into blue and red teams, to creating color variations of an armor piece, to letting the player pick the exact shade for their pet’s fur color. Or, in the case of Flower Garden, to change the colors of the petals on the fly.

There are two requirements for this:

  • We want to change colors dynamically.
  • We only want to affect certain areas of the original texture.

That rules out creating texture variations ahead of time, although that might be a valid approach sometimes if you have lots of art resources, don’t mind increasing the download size, and you have a fixed number of variation to deal with. It also rules out modulating/blending the texture by a particular color because it would tint all the texture, and we want to limit the effect to particular areas (leave the player’s arms their normal color, but change their shirt color).

This is one of those funny cases that it was a lot easier to do many years ago, when we used palletized color modes. You could set all the custom color areas to a particular palette entry, and then update that entry on the fly. Ah, all the awesome tricks palettes opened up the door to! I still miss them to this day.

color.jpgIn modern hardware it’s also really easy to do with a shader, but Paul wanted to use it across any iPhone device, and the majority of them are still stuck on OpenGL ES 1.1, so fixed-function pipeline it is.

The simplest approach would be to just render the model twice: First pass renders the texture, and second pass renders the custom color bits (you can render them with a white texture modulated by the global color to get the right color). The main drawbacks are that you’re doubling the number of draw calls, and, with 3D objects, it gets a bit tricker because the second pass needs to use the glDepthFunc(GL_EQUAL) depth comparison function.

The better way to do this is using the texture combiners. Texture combiners allow us to perform a limited number of operations to control the final look of a pixel. We can add two textures, or multiply them, or even do a few more complex operations. The true power of the combiners is that they can be chained together, so the output from one feeds into the input of another, allowing us to create much more complex operations.

The iPhone 3G is limited two two texture combiner units [2], but even two combiners are good to create a good range of effects.

Let’s think about what we want to accomplish. We want to leave some parts of the texture completely alone and display the original pixel value. In some other parts of the texture, we want to replace the pixels there with a custom color. Actually even better, we probably want to multiply those pixels by a custom color. That way we can author the part of the texture that is going to change with grayscale details, and our color adds the tint to it.

Let’s express it mathematically. Let’s make a function M that is 1 for every pixel we want to color, and 0 for the ones where the original texture is supposed to be displayed. Our desired color is c and the texture it t. In that case, the final pixel color (p) is:

p = M*(c*t) + (1 – M)*t


texture.jpgmask.jpg

We could express that with two combiners: The first one is a modulate (multiply) operation with c and t, and the second one an interpolation operation between the result of the previous combiner and the original texture, based on the function M.

Obviously M is just a mask texture. We can paint it white where we want to color the texture, and black elsewhere. We could even use the alpha channel of the original texture, but there’s one big thing to watch out for: If you have your texture as a png and process it through the default iPhone resource operations, the image will be premultiplied for you (whether you want it or not), so your color information will be set to zero everywhere that the alpha channel is zero. Oops. You’ll probably want to use the alpha channel to store transparency anyway, so we’ll keep the mask separate. If not, make sure you encode the image yourself (as raw or PVRT formats) so it’s not premultiplied ahead of time.

Are we ready transfer that formula to the texture combiners? Not quite. Apparently (and this was just trial and error, I haven’t seen it documented), the texture assigned to a combiner can only be the one at that stage. If you look at the second combiner, we would need to have the first texture as one of the parameters, in addition to the mask.

So instead, we can reorganize the function above like this:

p = c*(M*t) + (t – M*t)

What did we gain by that? The color is what’s going to change dynamically, but the mask and the texture always stay the same. We could precompute the M*t term by simply multiplying the texture and the mask. We can call that new term A. We can do the same thing with the (t – M*t) term, which just means turning black all the pixels in the texture where mask will go. That one will be B. The easiest way to “precompute” those values is just doing it in Photoshop and exporting it as a new png.

A.jpgB.jpg

Our new formula is now:

p = c*A + B

Nice and simple! Now we can really add that to the texture combiners like this:

// c
glColor4f(m_customColor.r, m_customColor.g, m_customColor.b, 1);

glActiveTexture(GL_TEXTURE0);
// A = M*t (precomputed)
glBindTexture(GL_TEXTURE_2D, m_maskHandle);
glEnable(GL_TEXTURE_2D);
// c*A
glTexEnvi(GL_TEXTURE_ENV, GL_TEXTURE_ENV_MODE, GL_MODULATE);

glActiveTexture(GL_TEXTURE1);
// B = t - M*t (precomputed)
glBindTexture(GL_TEXTURE_2D, m_textureHandle);
glEnable(GL_TEXTURE_2D);

// c*A + B
glTexEnvi(GL_TEXTURE_ENV, GL_TEXTURE_ENV_MODE, GL_COMBINE);
glTexEnvi(GL_TEXTURE_ENV, GL_COMBINE_RGB, GL_ADD);
glTexEnvi(GL_TEXTURE_ENV, GL_SRC0_RGB, GL_PREVIOUS);
glTexEnvi(GL_TEXTURE_ENV, GL_SRC1_RGB, GL_TEXTURE);

One more thing to watch out for: Because we’re using two textures, you need to have two sets of texture coordinates. In this case, we want them to be the same, so we can just point them to the same set of data:

glClientActiveTexture(GL_TEXTURE0);
glTexCoordPointer(2, GL_FLOAT, sizeof(Vertex), &vertices[0].u);
glEnableClientState(GL_TEXTURE_COORD_ARRAY);
glClientActiveTexture(GL_TEXTURE1);
glTexCoordPointer(2, GL_FLOAT, sizeof(Vertex), &vertices[0].u);
glEnableClientState(GL_TEXTURE_COORD_ARRAY);

That’s it! You can see the results in the included project and play with the register combiners to achieve different operations.

At this point I was going to describe the texture combiner setup I use in Flower Garden to render the petals, but this post ended up taking longer than I had hoped for (I’m trying to shoot for an hour per post, but this has taken me already two hours between the code and the the post itself), so I’ll save that for another time.

[1] Paul developed Sword of Fargoal, by far my favorite iPhone RPG.
[2] The 3GS allows up to eight I believe.

This post is part of iDevBlogADay, a group of indie iPhone development blogs featuring two posts per day. You can keep up with iDevBlogADay through the web site, RSS feed, or Twitter.