
It’s one thing to go on record saying I wouldn’t be creating an iPad-specific version of Flower Garden, and another seeing the iPhone version running on an iPad with all the ugly jaggies and huge, pixelated text. So when it came time to do a new update, I decided to at least take advantage of the iPad capabilities to make the existing app prettier by making Flower Garden into a universal app. It’s now available on the App Store, so go get it and check it out!
Surprisingly, there wasn’t that much documentation on how to go about making a universal iPhone/iPad version. There’s a document from Apple showing some initial steps, but that’s about it. So I wanted to share what I learned along the way, including some very useful tips I learned through trial and error or by doing a lot of digging through Twitter and the development forums.
Flower Garden is a strange hybrid of OpenGL and UIKit, which made things more complicated than if it were just one or the other. Learning curve and all, it took two full days of my time. If you’re using just OpenGL or just UIKit, the conversion to a universal app will be significantly faster.
Universal Project
The first thing you need to do is understand what’s going on with all the SDK versions. At this time, the latest iPhone OS version is 3.1.3, but you’re going to be developing the universal app with SDK 3.2. You want the resulting binary to run on both 3.X OS on iPhones and 3.2 OS on iPad. It’s a very similar situation to when we were writing apps that worked on both 3.X and 2.X.
So fire up XCode 3.2.2 (yes, all those version numbers start getting very confusing–that’s the XCode version that comes with SDK 3.2), and load your iPhone project you want to make into a universal one. If you look under the Project menu item, you’ll see an entry called “Upgrade Current Target For iPad”. The Apple documentation even warns you not to create a universal app in any other way.
Go ahead and use it if you want. It will work… as long as you have a single target you want to convert. For some inexplicable reason [1], it will only work once per project (even though it’s phrased as working with whatever the current target is). When would you have more than one target executable? If you have a free and a paid version for example.
Besides, I’m uncomfortable with automated “smart” tools that do things behind my back without me knowing exactly what’s going on, so I upgraded by hand by looking at the diffs of what the upgrade command did. It turns out it’s extremely simple.
- Under the project properties, set your base SDK to 3.2.
- Set Architectures to “Optimized (arm6, arm7)”
- Uncheck “Build Active Architectures Only”
- In the Deployment section, set it to SDK 3.1.3 (or whatever 3.X you want to target)
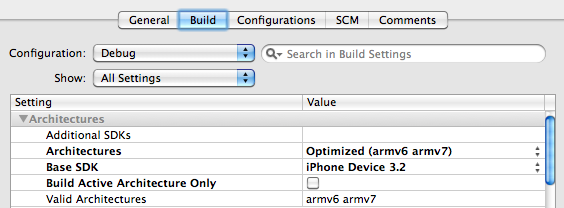

That’s it, really. That’s all you need to compile and run your app both on an iPhone and an iPad. When you build for the device, it will compile both arm6 and arm7 versions and create a combined fat executable with both. And yes, this means the size of your executable is going to double (which could be an issue if you’re near the 20MB limit). In the case of Flower Garden, the combined executable is 3.4MB, so that’s not a big deal.
iPad Functionality
What about that new xib file that the upgrade process creates? You don’t really need it. It’s there in case you want to have a different set of xibs for each platform, and it’s hooked up to the info file so the app knows to load it at startup.
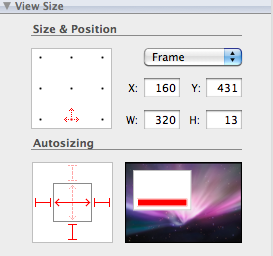 For the universal version of Flower Garden, I wasn’t trying to make a whole new brand experience on the iPad. Instead, I was looking for a quick and easy way to make it look much better. Because of it, I decided to reuse the same xib files as for the iPhone version.
That meant I had to go in Interface Builder, and adjust the autosize properties for a lot of the views. Some of them I wanted to stretch and get bigger with the high resolution iPad screen (background views). Others, I wanted to leave at the same size, but remain at the same relative distance from a particular border (buttons). Some other ones, I left the same size and their position just scaled up with the resolution (info boxes). All in all, that was the most time-consuming part of the process. It also required a few tweaks here and there to support the resolution change correctly.
The other big change was updating the resolution of the 3D views. Fortunately, that was just worked without a single line change. The render target code I’m using, takes the view dimensions and creates a frame buffer of the correct size. And it’s not just the dimensions: Remember that the iPad has a different aspect ratio (grumble, grumble), so you need to make sure your perspective and orthographic projections take that into account.
The only other changes I had to make was supporting an upside-down portrait orientation. That was very easy because the frame buffer didn’t have to change. Make sure you support it both at launch time and during gameplay. If you have a root controller whose view is attached directly to the main window from the start, it’s as easy as adding this to your controller:
- (BOOL)shouldAutorotateToInterfaceOrientation:(UIInterfaceOrientation)interfaceOrientation
{
    return (interfaceOrientation == UIInterfaceOrientationPortrait ||
            interfaceOrientation == UIInterfaceOrientationPortraitUpsideDown);
}
And make sure you add the supported orientations to your plist.

Finally, before you submit it to the App Store, you’ll need an iPad-specific icon. The documentation explains how to explicitly list all the icons in the info file, but at the very least, you can provide a file called Icon-72.png that is a 72×72 image and you’re done.
Running On The Simulator
This is one that should be a lot easier than it is. You’re creating a universal binary with SDK 3.2. Now you want to run it on the simulator. No problem, you run it as usual and you get the iPad simulator. You can debug it and do everything you normally do.
Now you want to run it on the simulator on iPhone mode. It turns out, that’s not so obvious.
You can’t just turn the simulator hardware setting to iPhone, because whenever you launch it from XCode it will override that again with the iPad one. Building and running on the 3.1.3 SDK is a no-no because you’re really running a different build than you’re going to be submitting (3.2) and all 3.2 SDK features you’re using are going to result in compile errors.
So after much searching and tweeting, here’s the solution:
- Build for 3.2 SDK on the simulator platform.
- Change project drop-down to 3.1.3 SDK
- Launch with debugger (Cmd + Options + Y). Don’t build and run!
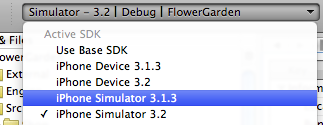
That will launch the simulator on iPhone mode, but still run your 3.2 build. Talk about unintuitive! [2]. The worst thing is, when you’re done, you need to switch the project to 3.2 again or you’ll get tons of compiler errors. That definitely has to go for SDK 4.0.
Here’s an invaluable tip. Maybe it’s obvious to long-term Mac users, but it baffled me for a while. The iPad simulator is very well thought out, and it has a 100% and a 50% mode. That makes it possible to use the simulator on screens without very high resolution. Even my external monitor at 1680×1050 can’t display the iPad simulator at full 1024×768 resolution in portrait mode because of the window borders.
The problem comes in when you want to take a screenshot to add to the App Store or anything else. On the iPhone simulator it was easy, but how do you do that with the iPad since you can’t fit it on the screen? Cmd + Ctrl + C will take a screenshot at full resolution even when running at 50% mode and add it to the clipboard! Switch over to Preview and select New from Clipboard and voila! Full resolution screenshot!
SDK 3.2 Features
Chances are that even if you do a simple iPad port, you’re going to end up using a few 3.2 features. The main one I used in the case of Flower Garden is a UIPopoverController. Here you should follow the steps outlined in the Apple documentation down to a T. But it comes down to this: If a symbol that is defined on 3.2 appears anywhere, even as a member pointer variable in a class, it will compile and run on the iPad fine, but will crash and burn on the iPhone.
So you need to both check that the 3.2 features are available, and you need to “hide” the new symbol so it never appears anywhere: Use an id variable and cast it based on the class info. Even casting it directly to the symbol you want will cause a crash.
Class classPopoverController = NSClassFromString(@"UIPopoverController");
if (classPopoverController)
{
    m_moreGamesPopover = [[classPopoverController alloc] initWithContentViewController:moreGames];
    [m_moreGamesPopover setDelegate:self];
    [m_moreGamesPopover setPopoverContentSize:CGSizeMake(320, moreGamesHeight) animated:NO];
    [m_moreGamesPopover presentPopoverFromRect:m_moreGamesButton.frame inView:self.view
                        permittedArrowDirections:UIPopoverArrowDirectionUp animated:YES];
}
Not pretty, uh? It works, but I couldn’t imagine doing this all over the place.
Gotchas
In the process of creating a universal app, I found a couple more things to watch out for.
When you submit the new binary through iTunes Connect and it’s accepted, the application status will change to something like “Missing screenshot”. If you go back and edit the app information, you’ll see there’s a new set of screenshots you can submit. You’ll need at least one for your application to enter “Waiting for Review” state. And if you have localized descriptions of your app, you’ll need to do that for every language.
Last, and perhaps most puzzling because I never figured this one out: I was not able to get in-app purchases to work with a test account from a development version of a universal app running on the iPad. I must have tried everything, but whenever I tried purchasing anything, it never brought up the familiar “sandbox environment” message. Also, items that hadn’t been approved yet did not show up in the list of available items. The exact same code worked fine on an iPhone, so that’s quite puzzling. Is it a major bug on Apple’s part, or did I miss some obscure “enable IAPs in debug mode” checkbox somewhere? It was a bit of a gamble submitting it like that, but fortunately, the approved version on the App Store allows in-app purchases without any problem.
I thought afterwards that maybe that was because the app version on the App Store was no universal, so the Store Kit server was not allowing the iPad version to access the store through the test account. But I tried it again even after it was approved and I had the same problem.
Has anybody managed to use an App Store test account from an iPad on a universal app?
Conclusion
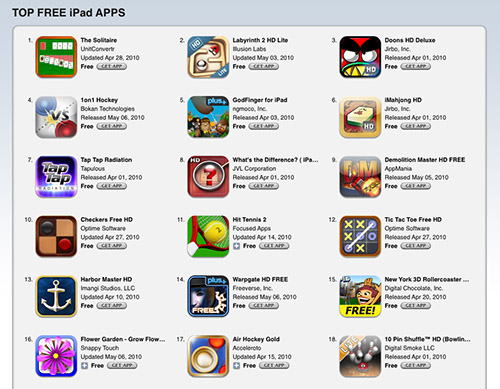
All in all, it was a relatively painless process considering it’s different hardware, with a different resolution, and it’s the first iteration of the SDK. Was it worth it? I think so. Apart from looking a lot better on an iPad, universal apps get ranked on both iPhone and iPad charts. Flower Garden managed to get all the way up to #14 on the free games chart on the iPad (and around #60 free app overall on the iPad). I’m sure it got some exposure from being so high up, which in turn helped the iPhone rankings as well.
I can’t imagine that my next game is going to be iPad-only, but I’ll certainly have the iPad in mind from the beginning and release it on both platforms. Whether I choose to go universal or separate apps will depend on the game and business decisions, but at least it’s good to know that it’s fairly easy to create a universal app.
[1] Actually, there’s a pattern that is clear by looking at the hoops we have to jump to do a universal build: Apple was clearly scrambling to get this out the door. As a result, things are buggy, unintuitive, and clunky. Hopefully all that will be fixed for SDK 4.0.
[2] See? That confirms point [1].
Haven’t got my iPad yet, but this whole experience of yours will come in very useful. Thank you very much indeed 🙂
Quick note that I found quite useful: UIInterfaceOrientationIsPortrait(interfaceOrientation)
Noel,
I downloaded the software on my ipad for mother’s day and I must say it’s awesome!! It is so ipad-ready I really enjoyed the experience.
How did you get the email to add your icon and other text *after* the image?
shul
Noel, I downloaded the software on my ipad for mother’s day and I must say it’s awesome!! It is so ipad-ready I really enjoyed the experience.
+1
Great post! With WWDC in June, do you expect the 4.0 SDK to roll out before July?
Thanks for the article, very interesting. I was particularly excited to read your solution to the “test in iPhone simulator” conundrum, since I had asked that very question on the Apple forums a few days ago, and was told in no uncertain terms that it was impossible. In fact, I went back there with your tip, and received an admonition from an Apple engineer: “You are asking for obscure, hard-to-track crashes by doing that. If you want to test a Universal app on an iPhone, use real hardware. Period.”
So… be warned.
Thanks everybody. Glad you’re enjoying Flower Garden on the iPad.
Shul, adding the image in the middle of the email requires uploading the image to my server and creating an HTML body that has an img tag pointing to it. As far as I can tell (and I’ve looked all over the place), you can’t reference an attached image in the body.
@Noel Ah! That explains it then, thanks! 🙂
p.s. I looked everywhere as well. For some reason adding html is possible and attaching an image is possible, but combining the two in a way that will show the image and then the text is not..
For what it’s worth, for the Lorax Garden, I ended up just attaching the image. It’s not as nicely integrated because it shows up at the bottom of the email (and it gets resized for you whether you want it or not), but it’s a lot simpler.
That’s an example of an API that the high-level is very convenient, but I really wish Apple would expose some lower-level functionality. Actually, that goes for most APIs 🙂
Thanks for the great info! I have also found the following post from Jeff LaMarche that shows you how to setup different main XIB and different key value pairs in the info.plist and detect iPhone/iPad at run time. http://iphonedevelopment.blogspot.com/2010/04/converting-iphone-apps-to-universal.html
Very valuable info! I was thinking about buying an ipad and this definitely helps my decision. Your guide was very helpful and i learned a lot from it. Thanks for the great article! keep it up!
I also had to set “Targeted Device Family”. That steps seems to be missing here…