I’m still working on prototypes. I’ve spent the last six months going through different game ideas and working on prototype after prototype. Along the way I’ve made over 20 different prototypes on iPad or iPhone. I’m sure a lot of those prototypes would have made decent iOS games, but I wasn’t particularly excited to develop them all the way and take them to completion. I’m looking for something that’s both very interesting to develop and something I can proudly point to after it ships.
Right now I have a couple of game ideas in hand that I’m pretty excited about. I prototyped one of those, but I quickly realized it might be a game better suited for desktops rather than iOS, so I decided to write my next prototype for that game on the Mac. Maybe another day I’ll write a post about prototypes, but what I want to write about today is my experience moving over my prototyping code to the Mac.I’ve been working on MacOS since 2007, when I switched because of iPhone development. For the most part, I’ve been loving it as an OS, but I never actually targeted it as a platform in my development. I figured it wouldn’t be very hard at all to compile my simple C/C++ + OpenGL code that I use as the basis for all my iOS games on MacOS. After all, that code started on Windows and DirectX, and porting it to iOS was pretty quick and easy. On top of that, I can use Xcode 4 for Mac, just like iOS (I’m not sure that counts as a plus though). How card can it possibly be?
The answer is, not hard at all, as long as you’re aware of a couple gotchas along the way.
Xcode project
I figured I would start from scratch, so I created a new Xcode project targeting MacOS. First surprise was that, unlike iOS, there wasn’t a template to create an OpenGL application. Instead, I need to create an empty Cocoa application and set things up by myself. No big deal.
I used the samples from Apple to get me started. I could have grabbed those and started adding stuff, but for some reason they have all the logic built into the OpenGL views, and I like to keep my views as simple as possible: they hold the surface to render, and they collect input and other window events. Done. So I had to do some moving around of code and responsibilities, which at the same time allowed me to make it more like the structure I used on iOS.
The AppDelegate does most of the initialization and creation on applicationDidFinishLaunching, and the OpenGL view gets created through the minimal nib file (with just a menu, window, and a view). AppDelegate is also responsible for setting up the display link callback, and then all the rest of the execution happens in my own code, away from those classes.
That was all pretty smooth. The only weird gotcha I ran into is that, unlike with previous Xcode 4 projects on iOS, I was no able to add any files to it that were not under the project root. They would turn red and not be available in the project. I tried adding them in every possible way and always got the same result. So, in the end, I gave in and just moved my External dir under the same directory as the Xcode project. Some people on Twitter had the same experience, while others didn’t, so there’s something fishy going on in there.
I have all my game static libraries (I refuse to call it an “engine”) as a separate Xcode project. I was able to add the project to the workspace and just change the target to be MacOS, and everything worked without a hitch.
OpenGL
I knew I was going to have to make some changes to the graphics code because all my iOS code uses OpenGL ES 2.0, and the Mac supports OpenGL “non ES” version. But I never did any graphics programming on the Mac, so I had no idea what to expect.
I decided to start with this sample code from Apple. After all, it seemed to be exactly what I was looking for: A simple project that sets up OpenGL both on iOS and MacOS. Score!
Once I started digging into it, I realized that it wasn’t going to be as straightforward as I realized. It turns out there were lots and lots of differences between OpenGL ES 2.0 and the OpenGL version on the Mac. Some were easy to catch, like different syntax for the shaders (“varying” became “in”, “uniform” was “out”, etc). Some were a pain to track down (needed to bind some Vertex Array Objects, and I was forced to use Vertex Buffers).
The documentation wasn’t clear on this point at all, but fortunately I got some good tips from Twitter. It turns out that the sample I used as a starting point created an OpenGL 3.2 context, and OpenGL 3.2 is very different from OpenGL ES 2.0.
	NSOpenGLPixelFormatAttribute attrs[] =
	{
		NSOpenGLPFADoubleBuffer,
		NSOpenGLPFADepthSize, 24,
		NSOpenGLPFAOpenGLProfile,
		NSOpenGLProfileVersion3_2Core,
		0
	};

	NSOpenGLPixelFormat* pf = [[NSOpenGLPixelFormat alloc] initWithAttributes:attrs];
	NSOpenGLContext* context = [[NSOpenGLContext alloc] initWithFormat:pf shareContext:nil];
	int swapInt = 1;
	[context setValues:&swapInt forParameter:NSOpenGLCPSwapInterval];
It turns out that leaving out the last attribute (NSOpenGLPFAOpenGLProfile) creates an OpenGL 2.1 profile, which is very similar to OpenGL ES 2.0 (GLSL 1.2 is the shader version that OpenGL 2.1 uses and that’s also very similar to GLSL ES). With that change, all the OpenGL code worked perfectly, with the only exception of the precision modifiers in shaders. Fortunately, I we can wrap those up in a simple #ifdef like this
#ifdef GL_ES
precision lowp float;
#endif
Unit tests
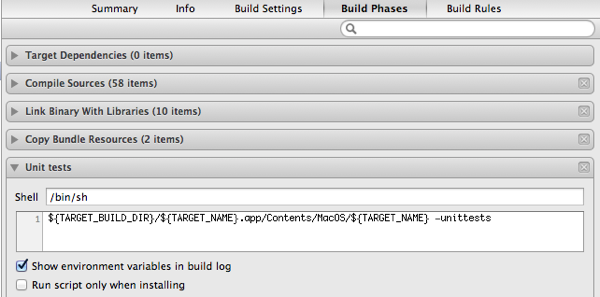
Apart from input, which will require a total re-work, the last major thing I had left was running unit tests after each build. I’ve seen references to Xcode’s unit testing functionality, but I was hoping to reuse UnitTest++ and run it like I do on iOS projects. It turns out it was even easier because you can run them natively without the extra step of the simulator like on iOS projects.
All I had to do was create a new phase in the Debug scheme to run a script. The “script” is just the name of the executable that was just build with the -unittest parameter added to it. I suspect that there’s probably a “better” way than hardcoding the .app/Contents/MacOS/ string in the middle to find the binary itself, so if someone knows the correct variable that includes that, let me know.
The only other thing that came up is that apparently Xcode adds the parameter -NSDocumentRevisionsDebugMode when you debug it from the IDE. No big deal, unless you have your program exit with an error if you pass an unrecognized parameter. I just made it accept and ignore that parameter, and everything worked like a charm.
Conclusion
It took a bit longer than I expected, but I finally have my code base running on MacOS. Iteration time is faster because it doesn’t even launch the simulator, and I suspect graphics performance will also be a lot faster (the iOS simulator does all the graphics processing in software), so I might end up doing more prototyping on the Mac unless the touch input is an integral part of the game.
My shader loader for Mac adds the following to the top, which basically makes things interoperable:#version 120#define lowp#define mediump#define highp#define texture2DLodEXT texture2DLod
You say you have to do an extra step to get your unittests to run on the iOS simulator? Mind sharing exactly what those steps are? I’m actually doing the opposite of you, I’m porting from OS X to iOS and I couldn’t figure out a way to get the simulator to automatically run my unittests.
Bit late, but using tricks like the one +Patrick Hogan suggests, or Cocos2D/Kobold2D the OpenGL code doesn’t have to be much different: shaders can be pretty much the same.
I love Mac’s OpenGL Shader Builder app, which used to be under /Developer/Graphics Tools or similar, but on Mountain Lion XCode 4.2 moved to being a downloadable extra.
It lets you create shaders from a template then try them out on the fly, even hooking up uniforms to animate between bounds.
I can’t use E-mail send flowers, each point of achievement will flash back, this kind of situation lasted for half a month, let me very upset, please help to repair