A successful game needs to provide top-notch content, and the best way to provide it is to optimize the content pipeline so that artists and designers can create, preview, add, and tweak new assets as easily and rapidly as possible.
This article was first published in the April 2004 issue of Game Developer Magazine.
Printer-friendly format.
Introduction
After years of being almost completely technology-driven, the driving force behind games is finally swinging towards the game content itself: level design, models, sounds, story, cinematics, etc. Major technological leaps are not making enough of a difference to set games apart from each other. Game content will also continue getting larger and more complex. The amount of content going into AAA games seems to double every few years. Since there’s no hardware upgrade for the artists and designers themselves, content doesn’t get created any faster.
A successful game needs to provide top-notch content, and the best way to provide it is to optimize the content pipeline so that artists and designers can create, preview, add, and tweak new assets as easily and rapidly as possible.
The content pipeline is the path that all the game assets follow, from conception until they can be loaded in the game. Game assets include everything that is not code: models, textures, materials, sounds, animations, cinematics, scripts, etc. During their trip through the pipeline, assets might be converted, optimized, chopped to bits, or combined. In the end, the asset is in a format that will be shipped with the final version of the game.
The first issue to consider when defining the content pipeline is its efficiency. With large teams of artists and designers constantly creating and tweaking game content, the content pipeline becomes a critical path. A slight inefficiency in the pipeline, such as taking one full minute from the time a change is made to the time it can be seen in the game, can easily cost a company thousands of wasted man-hours during the course of a project. Alternatively, if the content creators don’t preview their work as frequently, the overall quality of the game will suffer.
The other main point to consider is robustness. The content pipeline is the jugular vein of a project: if it breaks it can quickly kill the whole project. You can’t afford to have 30 idle people waiting for the pipeline to be fixed, or working around it and consequently losing half their work. Whatever happens, the pipeline must always work correctly.
Bird’s-Eye View of the Pipeline
What does an asset pipeline look like? It depends on the project. On one extreme, in some projects the pipeline is minimal and informal: assets are exported from their tool and loaded directly in the game. While that might be sufficient for small games, it usually doesn’t hold up well in large projects: Where are the files stored so multiple people can work on them? How are assets for multiple platforms dealt with? How can the format of the resources be changed easily? How can any extra processing be applied to them?
On the other end of the spectrum, pipelines can be very deep and elaborate. Adding a new asset to the game requires going to the pipeline guru and asking him to add the new content, causing turnaround time to suffer significantly.
This article presents a general pipeline that many different game projects can adopt and modify to fit their needs. It is fairly lightweight and provides a quick turnaround time, yet it allows for any number of expensive steps to be performed on the assets along the way. This is the pipeline that we’re using at Day 1 Studios for our current Xbox project, MechAssault 2. A previous incarnation of this pipeline was used in MechAssault 1. This pipeline might be a good starting place if you’re just beginning a new project, or you can try to adapt some of the ideas that make sense for your current situation.
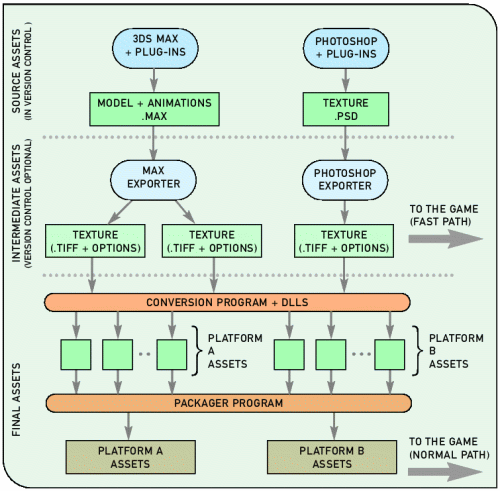 Figure 1. A partial view of the MechAssault 2 content pipeline (only models and textures shown).
Figure 1 shows the pipeline for some of the major types of assets in MechAssault 2. The following sections describe in detail each of the pipeline stages.
Source Assets
Source assets are those created by artists and designers, usually through some specialized tool (both in-house tools and off-the-shelf ones). A source asset is one that can be put into the pipeline and will be converted into the final asset without any human intervention. The key idea is that source assets should contain all the information necessary to add them to the game correctly. A material should have all its specular parameters specified, and a model should have all the flags in the weapon barrels so the game knows from what point to shoot projectiles. This is what will allow us to automate the pipeline later on.
The way source assets are created can vary significantly. Sometimes they are created through a set of different, very specialized tools (one for modeling, one for texture creation, one for specifying game information, one to lay out a level, etc). Other times, one large tool (often done as a plug-in in the model-editor program) can be used to create all the assets and export full levels.
Since the source assets contain all the information needed for the final assets in the game, we should treat them very carefully and protect them from being lost or accidentally overwritten. Using a version control program provides a centralized location for all assets, prevents people from overwriting each other’s work, and keeps a history of previous versions of each asset. Keep in mind that source asset files can sometimes be as large as several hundred megabytes each, so make sure your version control program is up to it and can also deal well with binary files.
Pre-rendered movies and sound are also game assets, but they’re often treated differently because of their huge size. They might have a slightly different path through the content pipeline: Maybe movies won’t be kept under version control, or maybe they will but only the most recent version will be kept in the database.
Intermediate Assets
Intermediate assets are exported directly from the source assets, usually with the tool they were created with. This requires a bit more plug-in work in the form of exporters if you’re dealing with off-the-shelf tools.
The intermediate assets are in a format that is very easy to read, parse, and extend without breaking backwards compatibility. These assets should contain all the information we could possibly want in the future, even if some of it gets discarded before the end. Loading performance is of no consequence at this point; we’ll leave that up to the final assets.
Plain text files are the perfect match for our requirements. In addition, XML is a particularly attractive option to structure those text files, especially if we need to represent information hierarchically. Doing so will also provide us with a whole range of tools and APIs to edit, parse, and transform files with minimal effort. If XML files are overkill for your needs, you can still use a simpler format like INI files or even write your own with minimal effort.
What is the purpose of having this intermediate asset format?
The main reason to have it is to provide a buffer between the source assets and the final ones. Final assets are optimized to load blazingly fast, but as a result, their format will often change and render previous versions unusable. In an ideal world, we would be able to efficiently re-export all source assets automatically into the new final asset format. Unfortunately, we don’t live in an ideal world, and that is often impractical. Many off-the-self tools used for modeling and texture creation are not easily and efficiently driven from the command line to batch re-export thousands of models at the time. The intermediate format is not likely to change much during the course of a project, so we can always use it as a starting point to generate our final assets.
 Another reason for having this intermediate format is to defer some of the complex and time-consuming operations like mesh optimizations or lightmap generation until a later time instead of doing them at export time. Also, we often end up creating a set of final assets for each platform we’re dealing with. Without the intermediate format, artists would have to export a set of assets for each platform, ensure they’re in synch with each other, and wait while each set of assets is converted and optimized every time an asset is changed.
Last but not least, having an intermediate format provides an excellent point for debugging and experimentation for the programmers. Intermediate assets should be in a very easily readable format, so anybody can view the contents of the asset, and even make small modifications for testing and debugging purposes without having to re-export them.
For MechAssault 2 we’re exporting full models into one XML file: all the hierarchy information, meshes, vertex data, and materials are included into one large XML file. One of those files for a detailed model can easily be 3-4 MBytes.
As much as plain text is a really nice format to work with, exporting textures into text format would be overkill. In the case of textures, we export them into 32-bit tiff files with custom information in the comments field containing any information artists specified from within Photoshop: bit-depth, dithering, mip-mapping options, etc. The advantage of this format is that all the image is still there since it’s exported at full 32-bits (although soon we’ll have to worry about larger color channels!), and images can be examined with any program that displays tiff files. Again, mip-mapping, changing bit depths, and dithering are not cheap operations we want to do at load time, but we’ll postpone all that until later.
It can be very tempting to modify an intermediate asset directly for many reasons: a “quick” change right before a milestone, the change we’re trying to make is not exposed through the plug-in of the tool, etc. We did exactly that in MechAssault 1 and ended up regretting it. We were too pressed for time to provide good plug-ins for our custom material types, so artists would modify material parameters on the intermediate assets directly. Those parameters would get overwritten next time somebody else re-exported the model and would have to be re-entered by hand. If you absolutely must modify intermediate assets, then consider providing full re-importing capabilities back into your source assets; however, this is usually not a trivial task. For MechAssault 2 we’re sticking to only making changes in the source and providing much better plug-in support, and things are running much more smoothly.
Even though this intermediate format is very flexible, chances are there will come a time during a project when it will be necessary to break backwards compatibility. Don’t fight it; get ready for it instead. Make sure you have versioning as part of the format, and that you can easily run a script through all exported intermediate assets and convert them to the new format. Since you hopefully chose an easily parsed format such as XML, the conversion process should be almost painless.
Final Assets
The final assets have been highly optimized so they can be loaded and used as efficiently as possible in their target platform. The specific file format doesn’t have to be particularly robust or withstand many format changes since the final assets will be regenerated many times a day. The number one goal here is speed. Ideally, this resource should be a direct memory image of what it’ll be in when it’s loaded in the game, so that it can be loaded straight without any parsing. The standard warnings about optimizations also apply here: don’t blindly optimize everything, and spend your time in those assets where you’ll get the most benefit.
If you’re doing multiplatform development, you’ll probably want to have one set of final assets for every platform. That way Xbox textures can be in their own format, and PS2 textures can be packed and formatted differently. At Day 1 Studios, even though we were only developing for the Xbox, we have two sets of resources: one for the Xbox, used in the game, and one for the PC, used in our PC-based tools.
The type of operations done at this stage range from quick ones such as simple format changes, to somewhat expensive ones such as mip-map generation, dithering, or compression, to really time-consuming ones such as lightmap generation and mesh optimizations. At this point we don’t care too much about how long it takes to perform an operation, we just care about the final result and how optimized the final asset is. As a result of this step some assets could be split into different assets (for example, our model XML file is split into several smaller files containing vertex and index data), and sometimes multiple assets get combined into one larger asset (packing a set of textures into one larger texture).
At Day 1 Studios, this step is performed by a command-line conversion tool, which takes a set of intermediate assets and produces the final assets. The actual conversion happens through a set of conversion plug-ins implemented as DLLs, each of which takes care of converting a particular type of resource (identified by filename extension or a header on the file itself). Any resources not handled by the conversion plug-ins are just copied straight through without any modifications.
Be warned that doing a full resource conversion on all the assets of the game can be a very time-consuming operation. There can easily be hundreds of thousands of files, and each of them needs to be loaded, parsed, converted, and saved in the new format. This process can take up to several hours even with a fast CPU and a very fast hard drive. Minimizing this time will help with the overall turnaround time, so you might want to profile the conversion program to find any obvious bottlenecks. Other solutions include doing incremental conversions (only convert files that have changed since the last build), and doing distributed builds (have a farm of machines where each one takes care of converting a subset of the resources).
During this step we should also generate errors and warning messages as necessary. Sometimes an asset won’t meet the requirements to be converted successfully (for example, a texture might be marked as needing mip-maps but it has dimensions that are not a power of two). It’s much better to prevent invalid assets from making it this far down the pipeline by preventing them from being generated in the first place, but we should still be ready for them here. By keeping a log of all the failed conversions and all the warning messages, the art and design leads can quickly identify what the problems are and correct them for the next build.
If you have specific dependencies between resources that need to be enforced (for example, packing all the textures for a particular model together and the textures need to be converted before they’re packed), you might want to use an existing dependency-management tool such as make or jam.
Catalog Files
The final step of the pipeline consists in packing all the loose final asset files into larger catalog files. A catalog file is nothing more than a large file containing other files inside, possibly along with their names and hierarchy information.
The advantage of using catalog files are pretty obvious: reduced number of open/close file operations, enforced physical proximity between files, easier and more efficient distribution of assets, faster directory parsing, etc. Surprisingly, not all modern games provide catalog files with their assets (you can usually tell who the guilty parties are by the outrageously long load or install times!).
Using a standard catalog file format (such as .zip, .cab, or even .wad) is very convenient because there are already-made tools to create, load, and view them. On the other hand, you might not have as much control over them as you want (for example, to enforce a specific file alignment or ordering for optimal seeking performance on a DVD).
In this step, the final assets for each platform are packaged into separate files. You might want to have separate catalog files for each level, or have sound and music on a separate catalog file from the rest of the assets. Those strategies will depend on how you need to load resources in your game. Once these catalog files are created, they can be copied onto the network and everybody can copy them locally to their machines or work with them directly from the network if there’s enough bandwidth. The game and the tools should be able to read these files directly and load any of the resources inside transparently.
The Fast Path
 Unfortunately, the process we’ve described so far isn’t exactly speedy. To make a change and see it in the game, we need to go through the following steps: modify a source asset, export the intermediate one, check it in version control, kick off a resource conversion, and wait for a few hours until new catalog files are ready. That doesn’t meet our earlier requirement of a fast turnaround time.
The solution is to provide a fast path into the tools and the game that bypasses all the time-consuming steps. In our case, we made it so both the tools and the game could load intermediate assets as well as the final assets (see Figure 1 again). All an artist has to do to see how their updated texture looks in the game is to export the intermediate asset, copy it on the directory where the game or tool expects to find it, and run the game. You can even provide a macro or a button that does all those steps at once, including launching the game to the correct level. The artists just make a change, push a button, and see their new assets in the game. It can’t get much easier than that.
How exactly is the local file loaded instead of the one residing in the catalog? That’s part of the magic of the file manager. As far as the tools and the game are concerned, they’re just opening a file like any other. However, our file manager gives local files priority over catalog files so they override any similar entries in a catalog file. Whenever the game attempts to open that file, the file manager redirects it to the local file. Otherwise it loads it from the catalog as usual.
Since we designed the intermediate format so it was easy to parse and modify, but not fast to load, isn’t that going to slow loading levels down to a crawl? It would if all the resources in the level were in the intermediate format. The idea is that only the assets that artists and designers are working with at the moment are going to be found locally in the intermediate format, so load times are only going to increase by a very small amount.
This approach also requires that the game and all the tools have code in them to load and parse assets in their intermediate formats. That is not a trivial amount of code, but chances are you’ve already written it to make it part of your conversion tool. However, you might want to strip this code out of the final shipped game, so separate it cleanly and surround it with conditional compilation statements so it’s easy to remove.
There is one important lesson we learned from using this fast load path: Make sure that your fast load path and your normal path (following the rest of the pipeline) both produce the same results; otherwise you’ll have some very disconcerted artists who are not sure why their assets look different after they check them in. In our case, we were using one library for texture conversion in the slow path and a different one in the fast path. The results were often similar, but sometimes different enough to raise a few questions. Whenever possible, use the same code in both paths.
Putting It All Together
Now that the whole pipeline is in place, we can finally start thinking about automating the process. It should be relatively straightforward to create a script to get the latest source or intermediate assets from source control, run the conversion process on all of them, and package them on the catalog files. Perl and Python are some good glue languages for that type of tasks. The most difficult aspect of the script is making it robust enough to deal with errors (network going down, version control server being down, etc), so take good care of that from the beginning. With such a script in place, we can run the resource build automatically once or twice a day, or on demand when new resources are needed.
The more we automate the content pipeline, the more important feedback becomes. People are not going to be watching every step of the pipeline, so we need to collect all the important information and deliver it to the people who care about it. In addition to gathering all errors and warnings, we might also want to collect other information, such as memory footprints, texture usage, or even some rough performance statistics. All that is best done as a final step to the resource build, running each of the levels in the game with the latest resource and executables. As a side benefit, it also serves as a very rough smoke test of the build.
Robustness was one of the goals of the pipeline from the very beginning. Part of it involves making sure that the conversion and packaging tools work flawlessly and report any errors correctly. The other part is making sure the game and the tools are never left in an unusable state because of bad resources. A good philosophy to maintain is that bad data should never break the game or tools; an artist or designer should never be able to crash the game. It might sound a bit radical, but it’s worth aiming for that goal. Any engineering time spent towards this will be paid back many times over as soon as assets start being added to the game at full speed. When loading a level, take the time to report any loading or initialization errors, disable the entities that had problems, and move on. In addition to that, it’s helpful to put some sort of ugly debugging model (a big pink lollipop in our case) in place of any entity that failed initialization.
Further Work on the Pipeline
Turnaround time is very good already, but we’d like to make it even shorter. We’d like the game to detect that some assets have changed and load them on the fly. This can be particularly beneficial for games without discrete levels where reaching specific locations is a time-consuming task.
A full resource build for MechAssault 2 can take up to an hour and a half. We’d like to further investigate the possibility of doing distributed builds. There are open-source, general frameworks for doing distributed operations that could be easily added to the process. We might also want to look into integration with the build systems such as Ant for added robustness.
Games are very different from each other and teams are organized differently, so content pipelines will vary significantly from project to project. It is important to identify the assets for a given game, what kind of operations will be done to them, who will be working on them, and at what stage of the development they will occur. Use whatever pipeline organization works best for your particular needs and automate as much of it as possible. The artists and designers in your team will thank you for it, and you’ll end up with a much better game in the end.